Friendship, Wine, and Sushi

It’s hard to believe that it has been a year since I spent this amazing weekend with such a special friend of mine.  Last May 2009, Mandy made the trip to Iowa City from Minneapolis to spend a weekend with me.  We had decided that it was time for girl talk…and vino…and our beloved cook-athons.  We weren’t sure just what exactly we would attempt to create…but we knew it would be good…and a heck of a lot of fun in the process!  We even managed to get in a “bathroom pic”…for old times sake.  I often wonder why we took so many headshots in the bathroom while we were in college….even more so, I wonder where the time has gone.

We started our weekend with a Friday afternoon trip to Wallace Winery, a wonderful winery just outside of Iowa City in West Branch, IA.  If you haven’t been there…it’s a must-visit!   (www.wallacewine.com)


The next day we did some shopping and worked up an appetite for our evening cook-athon.   On the menu….SUSHI!  Neither of us had ever made sushi before but we figured it couldn’t be THAT difficult….

In this post, I will share with you some insights for getting started, our experience, and of course, the sushi roll recipes that we tried.    Before you get started, here are a few things you will need:

  • Cutting Board & Sharp Knife
  • A wooden spoon to spread rice
  • Plastic Wrap
  • A large wooden or glass bowl
  • Makisu – A bamboo rolling mat
  • Kokuho Rose Rice
  • Marukan Rice Vinegar
  • Roasted Black Sesame
  • Nori Seaweed Paper
  • Wasabi (Japanese horseradish mustard)
  • Gari (Pickled Ginger
  • Low Sodium Soy Sauce
  • Fish, Seafood, and/or Vegetables (see recipes below)

As we headed out to pick up our supplies, our first stop was:  East West Oriental Foods.  Sounded appropriate…And what we didn’t find at this Oriental Mart…we found at our local HyVee.  I’m telling ya, HyVee is a one stop shop.  They have it ALL!

 With our ingredients and supplies in hand, we whipped up Spicy Tuna Rolls, Mango Tango Rolls, and Avacado Crab Rolls.  

SPICY TUNA ROLL

  • 2 cups Freshly Prepared Sushi Rice (Kokuho Rose Rice)
  • 2.5 cups water
  • pinch of salt
  • 6 tablespoons Rice Vinegar
  • Nori Seaweed, roasted sheets
  • 1 tablespoon Sesame Seeds
  • 1 cucumber, cut into slivers
  • 1/2 pound Fresh Raw Tuna
  • 2 tablespoons Mayonnaise, divided
  • 2 teaspoons Rooster Sauce, divided

Chop tuna and mix with mayonnaise and rooster sauce. 

Combine the water and rice in a saucepan and bring to a boil. Cover, reduce heat to low and simmer for 20 minutes, or until rice is tender and water has been absorbed. Remove from the heat and stir in the vinegar and a pinch of salt. Set aside to cool.

Tear a piece of plastic wrap and lay it on top of the bamboo mat.  Dampen your fingers in water.  Spread a thin layer of sushi rice over the plastic wrap (approx the same size as the half sheet of nori paper).  Leave a 1-inch margin (nori should be 1-inch larger than the rice).  Cut nori sheet in half and place it on top of the rice, shiny side up.    (Remember, you can roll sushi with rice on the outside or seaweed on the outside.  We did it both ways.  Whichever you choose, start with that ingredient first.)

Spread tuna mixture lengthwise. Position tuna about 1 inch away from the bottom edge of the seaweed.  Sprinkle with sesame seeds.  Lay cucumbers slivers on top.

To roll; slowly fold the end of the mat closest to you over the filling and tuck it in. (This is precisely where we started to have trouble!  LOL)

Use medium pressure to create compact tube. Remove the mat from around the roll, press in the loose ends and place it on a cutting board, seam side down.

Using a wet, sharp knife, slice the roll in half then in 6 equal pieces.

Combine mayonnaise and rooster sauce.   Spoon the mixture into a sandwich bag.  After cutting one of the bottom corners of the bag open, squeeze the sauce onto the top of the sushi rolls.

Serve with wasabi, soy sauce and pickled ginger.

Once we had all of the ingredients prepped…learning how to roll was a challenge!  So…naturally, I let Mandy take the first stab at it.  LOL.  So far…so good….

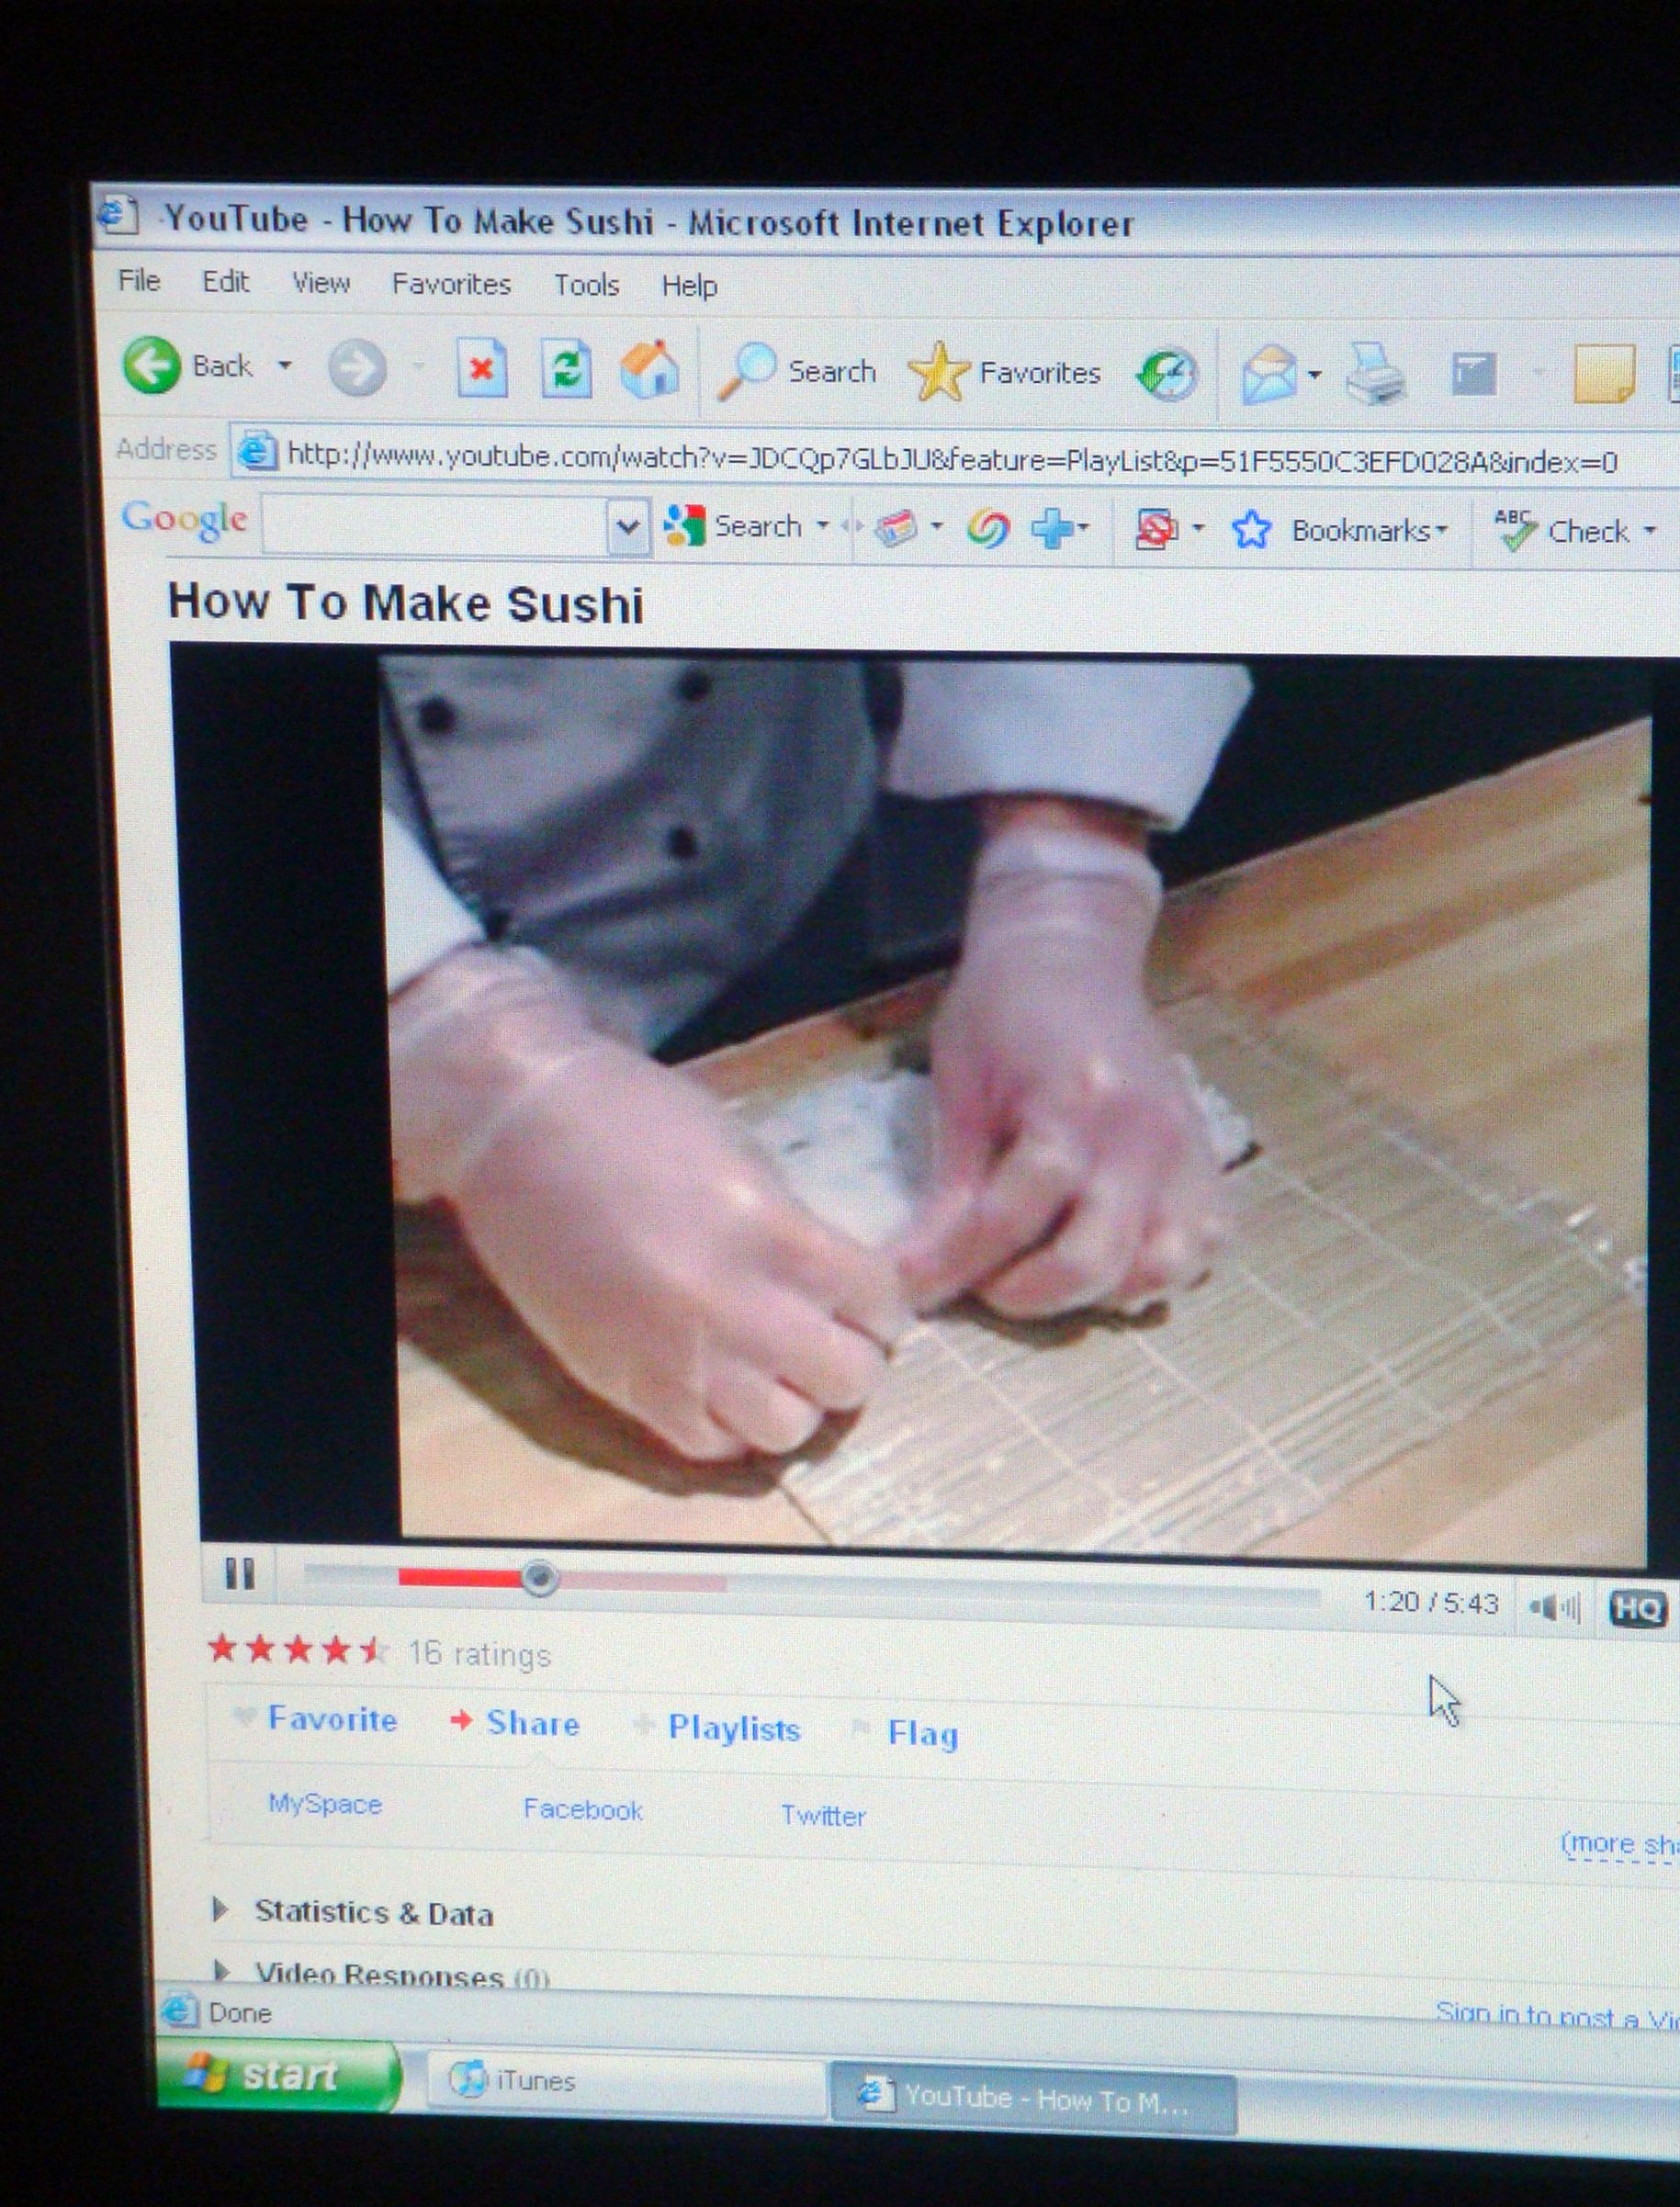
Ummm….oops!  That didn’t turn out exactly as we had hoped.  With Mandy’s recommendation (brilliant, by the way), we decided to YouTube some instructions. 

“How to Make Sushi”….exactly the tutorial we were looking for!  And with that brief video clip…Mandy whipped up another one.  This time…PERFECT! 


I wish I could say that I did as well on my first roll (even having watched the YouTube clip first)…but I wasn’t as talented.   But…after a try or two…we were sushi-makin-machines!

After putting togther our Spicy Tuna Rolls…we were onto the Avacado Crab Rolls and the Mango Tango Rolls!

AVACADO CRAB ROLL w/Smoked Salmon

  • 2 cups Freshly Prepared Sushi Rice (Kokuho Rose Rice)
  • 2.5 cups water
  • pinch of salt
  • 6 tablespoons Rice Vinegar
  • Nori Seaweed, roasted sheets
  • 1 Avacado, sliced
  • 1 Cucumber, cut into slivers
  • 1 pkg Smoked Salmon
  • 1/2 pound Imitation Crab Stick (fresh if you can find it)

Combine the water and rice in a saucepan and bring to a boil. Cover, reduce heat to low and simmer for 20 minutes, or until rice is tender and water has been absorbed. Remove from the heat and stir in the vinegar and a pinch of salt. Set aside to cool.

Tear a piece of plastic wrap and lay it on top of the bamboo mat.  Lay smoked salmon fillets on top of the plastic wrap.  Dampen your fingers in water.  Spread a thin layer of sushi rice over the salmon/plastic wrap (approx the same size as the the half sheet of nori paper).  Leave a 1-inch margin (nori should be 1-inch larger than the rice).  Cut nori sheet in half and place it on top of the rice, shiny side up. Leave a 1-inch margin at the ends uncovered to seal the roll.

Lay crab, avacado, and cucumber lengthwise. Position them about 1 inch away from the bottom edge of the seaweed. 

To roll; slowly fold the end of the mat closest to you over the filling and tuck it in.

Use medium pressure to create compact tube. Remove the mat from around the roll, press in the loose ends and place it on a cutting board, seam side down.

Using a wet, sharp knife, slice the roll in half then in 6 equal pieces.

Serve with wasabi, soy sauce and pickled ginger.

MANGO TANGO ROLL

  • 2 cups Freshly Prepared Sushi Rice (Kokuho Rose Rice)
  • 2.5 cups water
  • pinch of salt
  • 6 tablespoons Rice Vinegar
  • Nori Seaweed, roasted sheets
  • 1 Avacado, sliced
  • 1 Red Pepper, cut into slivers
  • 1 Mango, sliced
  • 1 Crab stick, shredded

Combine the water and rice in a saucepan and bring to a boil. Cover, reduce heat to low and simmer for 20 minutes, or until rice is tender and water has been absorbed. Remove from the heat and stir in the vinegar and a pinch of salt. Set aside to cool.

Tear a piece of plastic wrap and lay it on top of the bamboo mat.  Dampen your fingers in water.  Spread a thin layer of sushi rice over the plastic wrap (approx the same size as the half sheet of nori paper).  Leave a 1-inch margin (nori should be 1-inch larger than the rice).  Cut nori sheet in half and place it on rice/bamboo mat, shiny side down.  Leave a 1-inch margin at the ends uncovered to seal the roll.

Spread shredded crab on nori sheet.  Position crab about 1 inch away from the bottom edge of the seaweed.  Top with red pepper, avacado, and mango.

To roll; slowly fold the end of the mat closest to you over the filling and tuck it in.

Use medium pressure to create compact tube. Remove the mat from around the roll, press in the loose ends and place it on a cutting board, seam side down.

Using a wet, sharp knife, slice the roll in half then in 6 equal pieces.

Serve with wasabi, soy sauce and pickled ginger.

I’m not gonna lie…this little cook-athon took several hours!  We started our shopping for groceries at 6pm…and were eating our dinner at 10pm.  But those 4 hours were full of laughter, love, and learning.  Mandy…we need to do it again soon.  Thank you for visiting me…cooking with me…and always being there for me.  Love you!


“The road to a friend’s house is never long.”  ~Unknown

Indulge.  In Life.  In Love.  In Food.

Fresh Indoor Herbs

If you love to cook…and you’re anything like me, you would agree that there is no substitute for fresh herbs!   Just like the delicious aroma and robust flavor of freshly minced garlic, freshly chopped herbs can make all the difference.  That being said…you can imagine what I was spending on herbs at the grocery store.  HyVee typically runs their herbs at 2 for $5….and at Fareway, you can often get out the door for $1.88…but even that quickly adds up at our house. 

Looking for a solution to my “herb-spending”, Ryan found an AeroGarden on slickdeals.net for $60 last January and immediately sent me the link.  I ordered ‘er up and away we went!  🙂  You aren’t going to believe the harvest we’ve reaped.  Wait and see…I have Basil coming outta my ears!  (Well…not quite…but you get the idea.)

The instructions that accompany the unit are really very easy.  Essentially, attach the top of the garden to the base, install the lamps, plot out your seeds, add water & nutrients (enclosed), plug in, and set lamp timer.

I chose the garden that accomodates 6 plants.  The most commonly used herb in our kitchen is Basil…so I chose 2 Basil plants along with Cilantro, Oregano, Parsley, and Mint.  I would have loved Rosemary…but it wasn’t an option online….so I have that one potted outside.  I’ll save my outdoor herbs for another post!

The Basil was the first to pop up.  There is something SO rewarding about watching the seedlings sprout! 

Check it out…they are all sprouting!

And just a week or two later…we are off to the races!  The Basil is out of control…and even we can’t keep up with it.

With that, our first clippings.  I used a handful here and there for our favorite Caprese Salad…but wasn’t sure what to do with the rest of the clippings…certainly I didn’t want them to go to waste.

I decided that I would keep my clippings in a bowl of water, near the AeroGarden Lamp, and see how long I could preserve them.  To my surprise, they held up well!

A few more weeks later…and you can see the crop continues to grow.  And quite honestly, I decided I needed to come up with something a little more aesthetically pleasing than that boring dish of clippings sitting on the counter…

That dilemma led me to this cute little vase.  It was perfect!  It has a small opening at the top…just big enough for the stems of my clippings…and yet small enough to stay on the kitchen counter near the AeroGarden lamp.  What I didn’t know…is that I was in for yet another surprise…

The vase was so perfect…that I left my clippings in the vase for just over a week…and viola!  The clippings (3) grew roots!! 

I understand that this is NOT rocket-science…but it certainly wasn’t planned.  Now…not only do I have plenty of herbs growing in my AeroGarden, but also have “new” plants to pot in soil! 

I am loving my AeroGarden…and can’t wait to clip some more basil, root it, and re-plant it over and over again.  If you are in need of a little basil…you know where to find me!  🙂

Indulge. In Life.  In Love.  In Food.

The Trusty Standby…

Tonight I share with you a couple of my favorite things…a delicious salad and Palmermo’s Primo Thin Pizza!  It’s true…there are nights that I just DON’T feel like cooking.  For example….the few days AFTER Mother’s Day weekend.  Seriously, I was done in the kitchen for a few days.   And whenever one of these nights hit me, my trusty standby meal is a good size salad and frozen pizza. 

But not just ANY frozen pizza…it has to be Palmermo’s Ultra Thin Crust Pizza!  It is flavorful, crunchy and light. 

While the pizza is baking in the oven, I generally whip up our favorite salad.  This is our “Go-To” salad….so much so that we load up on Kraft Balsamic Vinaigrette every time it goes on sale.  Kraft knocked it outta the park with that one! (PS – it makes a great marinade for chicken too)

BOUDREAU’S BALSAMIC SALAD

  • Romaine Lettuce (Dole Greener Selection or Italian Blend)
  • Santa Sweet Tomatoes, halved
  • Green Pepper, diced
  • Cucumber, sliced and diced (optional)
  • Freshly grated Romano or Parmesan cheese
  • Kraft Balsamic Vinaigrette salad dressing

You know how to make a salad…throw all of the veggies in a bowl…and top with cheese and dressing! 

Fast…easy…and an all-time favorite at our house.  In fact, last summer, my friend Brooke and I would get together once a week, run and then make dinner together.  And each time I would ask her to bring a salad…she would say, “No!  I want YOUR salad.” 

So there you have it…a quick, delicious meal when you just DON’T feel like cooking!

Indulge.  In Life.  In Love.  In Food.

Paninis For My Handyman

In an earlier post, I told you all about the cooking and shopping and hanging with mom that went down over Mother’s Day weekend but I forgot to mention just exactly what Mr. Boudreau was up to all that time.  You see, he may be a research scientist…but he is also one hell-of-a-handyman!  Since moving into our new house last June, he has installed & wired recessed lighting in the kitchen, installed & wired penant lighting, Installed new ceiling fans in every room, installed new carpeting in the porch, ripped out a bedroom and transformed it into a home gym, ordered & hung new blinds, re-created our guest bath, changed knobs and fixtures….AND THE LIST GOES ON.  But this Mother’s Day weekend…he installed new countertops in ALL 3 upstairs bathrooms!!  He was a counter-cutting-n-installing machine.  🙂

I should have taken some before pics of the masterbath…but I didn’t.  Here is the new bath (waiting to repair frame on mirror):

And in the half bath off the kitchen, ladies and gentlemen, the finished product….

I haven’t posted pics of the guestbath…still waiting on fixtures.  But for all of your hardwork….Thanks Buddy!

All that leads me to today’s recipe(s)….while Ryan whipped up a new look in the bathrooms….I whipped up PANINIS for lunch!  

The first panini I made was Napa Style….very similar to a cold sandwich that we enjoyed in Wine Country….made fresh at the Oakville Grocer.  If you’ve never been to an Oakville Grocer (Napa Valley or Healdsburg CA)…you must go!  Amazing.  http://www.oakvillegrocery.com/stores/napa_valley.php

ITALIAN PANINI

  • Foccacia (I bought mine from Panera)
  • Genoa Salami
  • Hard Salami
  • Provolone, thinly sliced
  • 2 Tbsp EVOO
  • 4 Tbsp Balsamic Vinegar
  • Red Onion, thinly sliced
  • Fresh Romaine Lettuce
  • Tomato, thinly sliced

One loaf of foccacia from Panera will make 2 sandwiches.  Cut the loaf in half and then slice the loaf open (like a bagel).  In a small bowl, combine EVOO and Balsamic Vinegar.  Using a brush, spread this mixture over the bread.  Layer salami, provolone, and vegetables.  Place sandwich on Panini maker for approx 5 minutes, until sandwich is heated through and cheese is melting.

And since mom was up for a little lunch, I thought I would make a panini a little more her style as well. 

CREAMY CHICKEN & SPINACH PANINI

  • Foccacia
  • Grilled Chicken Breast
  • 2 Tbsp Extra Light Olive Oil
  • Tostitos Creamy Spincach Dip
  • Provolone, thinly sliced
  • Tomato, thinly sliced
  • Fresh Romaine Lettuce

Once again, I used foccacia from Panera.  Cut loaf in half and slice like a bagel.  🙂

Brush olive oil on both sides of chicken breast.  Grill at 400 degrees for 6-7 minutes per side or until cooked through.  While chicken is grilling, spread Creamy Spinach dip (amt to your liking) over the inner sides of the foccacia.  Layer provolone, lettuce and tomato.  Add grilled chicken breast.  Place sandwich on panini maker for approximately 5 minutes or until heated through and cheese is melting.

Of the two sandwiches, the Creamy Chicken and Spinach was definitely the best!    The Italian panini was also great…but since Ryan & I LOVE our Oakville Grocery sandwich…we’ve decided we prefer this classic cold.  Try it…and let me know what you prefer!

Indulge.  In Life.  In Love.  In Food.

Red Wine Spritzers!

Do you know what today is?   Yes…today is FRIDAY (TGIF!)…it is also May 21, 2010…my husband’s 30th birthday.  And that is reason to celebrate!

Happy Birthday Buddy!  Remember when we were turning 16 & 17….seems like yesterday.  🙂


And now…here we are…moving into yet another decade.  Enjoy your weekend in DC & I look forward to celebrating with you when you return!  CHEERS!


Speaking of “Cheers”…I intend to celebrate Ryan’s birthday and the beautiful forecast (Saturday:  Mostly Sunny & 82 degrees!) with a Red Wine Spritzer…or 2!  Ahh…they are my favorite.

RED WINE SPRITZER

  • Bottle of Crane Lake Merlot  (Substitute any cheap red wine of your liking)
  • Diet 7Up
  • Lemon

I usually make my Red Wine Spritzers individually, tho you could make them by the pitcher.  Begin by filling your glass with ice.  Squeeze 1/4 of a lemon into the glass.  Pour red wine into glass until 1/2 – 3/4 full.  Top with diet 7Up and garnish with a lemon wedge.

This will be your new favorite summer beverage…I promise.  Enjoy!

Indulge.  In Life.  In Love.  In Food.


Sticky Buns for my Honey Buns!

My mom is crazy about some things…Cinnamon Rolls and Sticky Buns being two of them!  As my last day with mom approached on Mother’s Day weekend, I knew I had to send her off that Monday morning with sweet rolls of some kind.  And after doing some searching on foodnetwork.com, I decided on a modified version of Barefoot Contessa’s Sticky Buns.  First of all…I love Barefoot…and secondly, the recipe looked so fast, easy, and scrumptous. 

You always run the risk of a new recipe not turning out as you’d hoped but this one did NOT disappoint!  I think I indulged in 2 buns that morning…and my mom had 2 or 3!  Try ’em….see if you can eat just one!  My bet is “No”.  These Sticky Buns whipped up quickly and were perfect for a morning treat…

Easy Sticky Buns

Recipe by Barefoot Contessa

Serves: 12 buns
  • 12 tablespoons (1 1/2 sticks) unsalted butter, at room temperature
  • 1/3 cup light brown sugar, lightly packed
  • 1/2 cup pecans, chopped in very large pieces
  • 1 package (17.3-ounces/ 2-sheets) frozen puff pastry, defrosted

For the filling:

  • 2 tablespoons unsalted butter, melted and cooled
  • 2/3 cup light brown sugar, lightly packed
  • 3 teaspoons ground cinnamon
  • 1 cup raisins (I omitted these)

Preheat the oven to 400 degrees F.  Place a 12-cup standard muffin tin on a sheet pan lined with parchment paper.

In the bowl of an electric mixer fitted with the paddle attachment, combine the 12 tablespoons butter and 1/3 cup brown sugar.  Place 1 rounded tablespoon of the mixture in each of the 12 muffin cups.  Distribute the pecans evenly among the 12 muffin cups on top of the butter and sugar mixture.


Lightly flour a wooden board or stone surface. Unfold 1 sheet of puff pastry with the folds going left to right. Brush the whole sheet with the melted butter. Leaving a 1-inch border on the puff pastry, sprinkle each sheet with 1/3 cup of the brown sugar, 1 1/2 teaspoons of the cinnamon, and 1/2 cup of the raisins. Starting with the end nearest you, roll the pastry up snugly like a jelly roll around the filling, finishing the roll with the seam side down.

Trim the ends of the roll about 1/2-inch and discard.

Slice the roll in 6 equal pieces, each about 1 1/2 inches wide.  Place each piece, spiral side up, in 6 of the muffin cups.  Repeat with the second sheet of puff pastry to make 12 sticky buns.


Bake for 30 minutes, until the sticky buns are golden to dark brown on top and firm to the touch. Be careful – they’re hot!

Allow to cool for 5 minutes only, invert the buns onto the parchment paper (ease the filling and pecans out onto the buns with a spoon) and cool completely…

Unless you are like me…..I prefer my sticky buns warm…so enjoy one while they are still hot!   Heavenly.

Indulge.  In Life.  In Love.  In Food.

Red Velvet…

You can’t celebrate Mother’s Day without dessert…especially with my mom in town!  So, as I tried to come up with a suitable option, I thought, why not make the same cake I made for Ryan’s Christmas party…after all, it went over well then….so well I emailed the recipe out to several friends/co-workers afterwards.  You’ll have to give it a try to see why.  🙂

SOUTHERN RED VELVET CAKE

Recipe by Chef Sara Moulton of the Food Network

  • Vegetable oil for the pans
  • 2 1/2 cups all-purpose flour
  • 1 1/2 cups sugar
  • 1 teaspoon baking soda
  • 1 teaspoon fine salt
  • 1 teaspoon cocoa powder
  • 1 1/2 cups vegetable oil
  • 1 cup buttermilk, at room temperature
  • 2 large eggs, at room temperature
  • 2 tablespoons red food coloring (1 ounce)
  • 1 teaspoon white distilled vinegar
  • 1 teaspoon vanilla extract
  • Cream Cheese Frosting, recipe follows
  • Crushed pecans, for garnish

Preheat the oven to 350 degrees F.  Lightly oil and flour 3 (9 by 1 1/2-inch round) cake pans.

In a large bowl, sift together the flour, sugar, baking soda, salt, and cocoa powder. In another large bowl, whisk together the oil, buttermilk, eggs, food coloring, vinegar, and vanilla.

Using a standing mixer, mix the dry ingredients into the wet ingredients until just combined and a smooth batter is formed.

Divide the cake batter evenly among the prepared cake pans.  Place the pans in the oven evenly spaced apart.  Bake, rotating the pans halfway through the cooking, until the cake pulls away from the side of the pans, and a toothpick inserted in the center of the cakes comes out clean, about 30 minutes.

Remove the cakes from the oven and run a knife around the edges to loosen them from the sides of the pans.  One at a time, invert the cakes onto a plate and then re-invert them onto a cooling rack, rounded-sides up. Let cool completely.

Frost the cake. Place 1 layer, rounded-side down, in the middle of a rotating cake stand.  Using a palette knife or offset spatula spread some of the cream cheese frosting over the top of the cake.  (Spread enough frosting to make a 1/4 to 1/2-inch layer.)  Carefully set another layer on top, rounded-side down, and repeat.  Top with the remaining layer and cover the entire cake with the remaining frosting.  Sprinkle the top with the pecans.

CREAM CHEESE FROSTING

  • 1 pound cream cheese, softened
  • 4 cups sifted confectioners’ sugar
  • 2 sticks unsalted butter (1 cup), softened
  • 1 teaspoon vanilla extract

In a standing mixer fitted with the paddle attachment, or with a hand-held electric mixer in a large bowl, mix the cream cheese, sugar, and butter on low speed until incorporated.  Increase the speed to high, and mix until light and fluffy, about 5 minutes. (Occasionally turn the mixer off, and scrape the down the sides of the bowl with a rubber spatula.)

Reduce the speed of the mixer to low. Add the vanilla, raise the speed to high and mix briefly until fluffy (scrape down the bowl occasionally).  Store in the refrigerator until somewhat stiff, before using.  May be stored in the refrigerator for 3 days.

Yield: enough to frost a 3 layer (9-inch) cake

Mmmm mmm mmm!  Slice and Serve!

With only four of us to enjoy this delicious cake, there was plenty for Mom to take back to Wisconsin.  I hope it travelled well…especially with that extra long stop at Diamond Jo Casino in Dubuque.  Ahh…I suppose it was worth it…that jackpot win of $1300!  Congrats Marshy!

Indulge.  In Life.  In Love.  In Food.

Feasting on Filet!

To say that cooking was once a competition in our household would be an understatement.  When we first moved in together, cooking with each other seemed so natural…and fun…and something we both really looked forward to….but then, our competitive natures took hold!  Don’t get me wrong, it was still fun….but somehow a relaxing night of making homemade pizza or scampi or filet turned into, “Who Can Do It Best?!”  After a few months of trying to out-do each other, we agreed that perhaps there WERE somethings that I made better…and somethings he had perfected.  Needless to say, I took over my favorites, he took the reigns on his, and some we continue to team-up on (for example, homemade spaghetti and meatballs…now that REQUIRES team effort!). 

Through this process we learned that one of Ryan’s masterpiece meals is Filet Mignon….due mostly to his attention to detail when choosing the meat (he insists on the deepest red filets he can find) but also to his patience when it comes to grilling it perfectly.  Besides, some would like to believe that grilling is a “Man’s Job”.  I’m not sure if that is true…but I’ll let him think so!  🙂

With my parents coming into town for Mother’s Day weekend, we knew Ryan’s Filet had to be included on the menu.  Dad always says it is better than any steak he’s had a restaurant…we’re not sure if that is true, but it is tender and tasty!  


FILET MIGNON with WHITE WINE BABY BELLAS  (Served with Green Beans and Romano-Garlic Mashed Potatoes)

Serves 4

  • 4 – 8oz Bacon-Wrapped Filets
  • Montreal Steak Seasoning (Regular or Spicy – we prefer the latter)
  • Extra Virgin Olive Oil
  • 8 oz Baby Bella Mushrooms, sliced
  • 2 Tablespoons White Wine (I use whatever I have open – usually Sauvignon Blanc)

To begin this meal, start by prepping all of your green beans, red potatoes, garlic, romano cheese, and baby bella mushrooms.  The ends of the green beans should be trimmed, the red potatoes should be quartered with a pot of water boiling, the garlic minced, the mushrooms sliced, and the romano cheese freshly grated.  Once these items are sliced, grated, minced or whatever need be, the rest of the prepartion comes together in a snap! 

Next, preheat the grill to 400 degrees.

As the grill heats up, pat each side of your filets (should be at room temp), with a thin coat of Extra Virgin Olive Oil.  Sprinkle Montreal Steak Seasoning (to your liking) on each side.  Depending on the thickness of the filets and the “done-ness” you prefer, cooking times will vary.  Ryan and I both prefer our steaks done medium so Ryan starts the filets on the bottom rack of the grill for ~5-6 minutes per side.  This allows the edges, top, and bottom of the steak to brown & sear in some grill marks for presentation!  😉  He then moves each filet to the upper rack for another ~2-3 minutes per side.  This cooks the filets through to the center…leaving it slightly pink…or medium.

In a small pan, begin to sautee the baby bella mushrooms over low heat.  Add 1 tablespoon butter (or margarine) and 8 oz sliced mushrooms.  Once the mushrooms have begun to brown, add a couple splashes of white wine (~2 tablespoons) and continue to sautee until liquid has evaporated.  I generally leave the mushrooms on low heat on the stovetop until ready to serve.

 While the filets are grilling and the mushrooms are sauteeing, begin the mashed potatoes.  As listed in a previous post:


ROMANO-GARLIC MASHED POTATOES

Serves 4

  • 8-10 Small Red Potatoes, quartered
  • 1/3 cup Freshly Grated Romano Cheese
  • 2 Garlic Cloves, minced
  • 1 Tblsp Butter/Margarine
  • Salt & Pepper
  • Dash or 2 of Milk (start with a little and add to consistency of your liking…be careful not to add too much…as taters will get runny!)

Boil potatoes until soft (~12 minutes) or just until the red skin is starting to seperate from the potatoes.  Drain.  Immediately put potatoes back into warm pot and add cheese, butter, garlic, salt and pepper, and milk.  With a hand mixer, beat until smooth and fluffy.  Using a spatula, move mashed potatoes to a microwave safe bowl and cover.  Reheat for 45 – 60 seconds just before serving.

And last but not least, prepare the green beans.


GREEN BEANS

Serves 4

  • 1 Lb Green Beans
  • Extra Virgin Olive Oil
  • Salt & Pepper

Bring water to a high boil.  Add beans and boil for 3-4 minutes (we prefer ’em crunchy!).  Drain. 

 Pour 1 tbsp EVOO into pot (should still be warm from boiling).  Add beans, salt, and pepper.  Toss until evenly covered.

 At this point, your steaks should be done, mushrooms warming on the stove, mashed taters reheating in the microwave (if need be), and green beans ready to plate!   Add a glass of Zinfandel, Malbec or your favorite Red and dinner is served!

Just another one of our favorite meals….one we treat ourselves to just a few times a month.  Mmmm…with a juicy filet, Ryan would argue it is perfect without A1…I, on the otherhand, can’t pass up the savory flavor on the side of my plate.  Whichever way you like it…ENJOY!

Indulge.  In Life.  In Love.  In Food.

Mother’s Day Marsala

Happy Mother’s Day to all the Moms out there.  I hope you all enjoyed your day yesterday!

In today’s post…and several more to come, I am honoring my mom.   This weekend my parents made the 5.5 hour trip to Iowa to spend Mother’s Day weekend with me, so I made sure to get Marshy out shopping, Hot Rod to the Casino (well, he is pretty good at finding his own way there), and lots of delicious food on the table.  It’s true, my parents never leave hungry.  And why not spoil them?   Oprah once said, “Biology is the least of what makes someone a mother.”  She is so right.  My mom is my one of my best friends, my confidant, my shoulder to cry on, and always my biggest fan!  Sometimes I have to remind her that I am NOT perfect.  🙂

As I planned the menu for the weekend, I tried to take all of mom’s favorites into consideration.  So, Friday night we headed to El Dorado for Mexican…she loves her some Chimichanga!  Saturday we started our day at Starbucks, enjoyed a girls’ only lunch at Biaggis, and finished the day with Filet Mignon.  Sunday, (Mother’s Day), we grilled up Creamy Spinach & Chicken Paninis for lunch and Mom’s favorite Chicken Marsala for dinner.  I also whipped up a Red Velvet Cake to indulge in for dessert.  And today, I woke up early and sent mom on her way with some Sticky Buns.  Like I said….well.fed.  (All of these recipes to come later this week!)

For now, let’s start with our Mother’s Day meal: Chicken Marsala with Grilled Asparagus and Romano-Garlic Mashed Potatoes.  I have made this meal several times before….and it is always a hit.

Start by making the mashed taters…it’s easiest to get these out of the way and reheat when the rest of the meal is complete.

ROMANO-GARLIC MASHED POTATOES

Serves 4

  • 8-10 Small Red Potatoes, quartered
  • 1/3 cup Freshly Grated Romano Cheese
  • 2 Garlic Cloves, minced
  • 1 Tblsp Butter/Margarine
  • Salt & Pepper
  • Dash or 2 of Milk (start with a little and add to consistency of your liking…be careful not to add too much…as taters will get runny!)

Boil potatoes until soft (~12 minutes) or just until the red skin is starting to seperate from the potatoes.  Drain.  Immediately put potatoes back into warm pot and add cheese, butter, garlic, salt and pepper, and milk. 

With a hand mixer, beat until smooth and fluffy.  Using a spatula, move mashed potatoes to a microwave safe bowl and cover.  Reheat for 45 – 60 seconds just before serving.

Next, prep the chicken and asparagues for grilling.  Bring the chicken breasts (called for in Marsala recipe below) to room temp and trim excess fat.   Lightly brush on Extra Light Olive Oil and sprinkle with salt and pepper.  Preheat grill to 400 degrees.

GRILLED ASPARAGUS

Serves 3-4

  • 1 bunch of Asparagus, trimmed.  (cut one inch off the bottom end of the asparagus and discard)
  • EVOO
  • Salt & Pepper

Once you have trimmed the bottom inch off of the asapargus, drizzle with EVOO and add Kosher Salt & Pepper.  Toss with tongs until covered evenly.

Once the grill has preheated to 400 degrees, place the aspargus on the top rack of the grill and the chicken, evenly spaced, on the bottom rack.  And average sized chicken breast should cook for ~6-7 minutes a side. 

The asparagus can be flipped about the same time as the chicken.  Remove from the grill when slightly blackened and tender.  Cover with lid or tin foil until the rest of the meal is complete.

While the chicken and asparagus are grilling, prepare the Marsala-Mascarpone sauce. 


CHICKEN MARSALA

(This recipe is adapted from a recipe by Giada De Laurentis)

Serves 4

  • 1.5 – 2 lbs Boneless/Skinless Chicken Breast
  • 1 lb Baby Bella Mushrooms, sliced
  • 1 Small Yellow Onion, chopped
  • 3 cloves Garlic, minced
  • 1 cup Marsala Cooking Wine
  • 8oz Mascarpone Cheese
  • 1/2 cup Freshly Grated Romano Cheese
  • 2 Tblsp EVOO
  • 2 Tblsp Unsalted Butter

Melt 2 tablespoons of butter in a large skillet over medium-high heat, add the onion and saute until tender, ~2 minutes. Add the mushrooms and garlic and saute until the mushrooms are tender and the juices evaporate, ~12 minutes. 

Add the marsala cooking wine and simmer until it is reduced by half, ~4 minutes.

Stir in the mascarpone.  Simmer, uncovered, over medium-low heat until the sauce thickens slightly, ~2 minutes.

Once the sauce is complete and the chicken is grilled to perfection, you are ready to plate your Chicken Marsala!  Divide the asapargus evenly among the plates.  With a large serving spoon, place a scoop of mashed potatoes on the plate and top with one grilled chicken breast and Marsala sauce.  Sprinkle freshly grated Romano cheese on top.


 Serve with a chilled glass of Sauvignon Blanc and enjoy!  (I prefer a cold glass while I’m cooking too….sshhhh)

Mothers hold their children’s hands for a short while, but their hearts forever.  ~Unknown.  

I love you Mom.  I hope you enjoyed your Mother’s Day.  I was blessed to share it with you.


Homemade ‘Zza!

Anyone who knows me well…knows I LOVE pizza….authentic Italian pizza, the tasty American version, and of course, our homemade ‘Zza!  I remember when Ryan and I were planning our wedding in 2005, he asked me what I wanted for the rehearsal dinner and without hesitation, I insisted PIZZA!  And not just any pizza, but the pizza we grew up eating together…the pizza we still look forward to when we go home to Marshfield, WI…the pizza we buy unbaked and frozen just so we can lug it back to Iowa…Scotty’s Pizza.  My mouth is watering just thinking about it.  For those of you who are unfamiliar, be sure to check it out if you ever roll through Marshfield.  (http://scottyspizza.com)  You won’t be disappointed!  And  to think that some swear I am high-maintenance….man, this little lady just wants a slice!

So last week, before I headed off to my brief stay in the Sunshine State with good friends, Jeremy & Stephanie, and my longer stay in Philadelphia for work, I wanted nothing other than our homemade pizza.  Over the last several years Ryan & I  have tailored it specifcally to our tastes….so much so that we began to wonder if anyone else would like it as much as we do.  So…the taste tests began.  First with my Mom & Dad.  Mom said it was “wonderful!”…but then again, she is my Mom!  And my Dad, well he loved it too…but let’s be honest, he’d eat just about anything!  So, on the night before my departure, I invited my friend Kendra over to taste test…her review was, “I.Love.It”.  

And with that, I share our favorite mix…

BOODRO’s Homemade ‘Zza

Serves 2-3

  • Pizza Crust Mix (Jiffy or HyVee brand usually)
  • HyVee Canned Pizza Sauce (to be doctored up)
  • Garlic Salt
  • Garlic Powder
  • Crushed Red Pepper
  • Presti’s Spicy Italian Seasoning
  • EVOO
  • Pepperoni
  • Baby bella mushrooms
  • Red Onion
  • Green Pepper
  • Green Olives
  • Low Moisture Shredded Mozzarella Cheese (approx 12 oz)
  • Pepperoncinis

Start by making the pizza crust.  Follow the instructions on the back of the box but ADD a dash or two of Presti’s Spicy Italian seasoning, garlic salt,  and garlic powder prior to adding the water.  Be careful not to add too much water.

Thoroughly flour your rolling pin and pizza stone.  Roll dough to shape and thickness of your liking…we make ours as big as the stone allows…and as thin as possible.  We love the crunch of a perfectly baked thin crust pizza!  Bake as directed on package.  Once crust is lightly browned, pull it out of the oven and beginning building your pie!

In a small prep bowl, mix ~3 Tbls of EVOO and a dash of garlic salt and a larger dash of garlic powder.  With a small brush, cover the crust completely in a thin layer of this garlic salt/EVOO mixture.  (At Scotty’s in Marshfield WI, Scotty serves a butter-crust pizza – this is our rendition of Scotty’s classic.  YUM!)

Pour half a can of HyVee (or brand of your choosing) pizza sauce into a prep bowl (save the remaining sauce for a second pizza).  Add Crushed Red Pepper (to your liking) to sauce and mix.  Pour sauce onto crust and spread with the back of spoon until evenly distributed.

Dress toppings listed above or substitute your own!  We start by layering pepperoni on top of the sauce, next a layer of thinly sliced baby bella mushrooms, slivers of red onion, green peppers, and green olives (on Ryan’s half only…ick…no olives for me!).  Top with ~12oz shredded Mozzarella cheese.

Bake for 10-15 minutes…until golden brown.  Serve with a pepperoncini or two and enjoy with a cold beer…diet cola…or a chilled glass of Sauvignon Blanc! 

Pizza….one of life’s little treasures! 

Indulge.  In Life.  In Love.  In Food.